This spreadsheet builds on the work of Dr. Kyla Terhune (DIO at Vanderbilt University Medical Center) and was developed by Kenneth Abbott at the University of Michigan.
Instructions
Please note: If you encounter any problems with this tool or have suggestions for its improvement, please reach out to info@covidstaffing.org.
Step 1: Download the Response Planner file.
(Follow the above link, click to download “Source code (zip),” decompress the .zip file, find the tool Microsoft Excel file inside.)
Step 2: Open the file; you will need to click “Enable Macros” when prompted.

Note: be careful not to reorder or delete any worksheets or columns in this workbook, or the automation to generate the staffing plan may not work.
When you open the file, you will see 12 worksheets:

Worksheets 2-10 (through “Teams_by_location”) ask you to input data (which the steps below will walk you through). Worksheets 11 and 12 will generate your hospital-specific Response Plan.
This tool is designed to produce a phased staffing plan for two scenarios: ‘normal’ mode (a surge of COVID-19 patients that can be handled through redeployment of staff and normal patient:provider ratios) and ‘crisis’ mode (a surge of COVID-19 patients that requires an all-hands-on-deck response with higher patient:provider ratios). If you wish to create a separate staffing plan with more than 2 staffing level scenarios (e.g., scenarios between normal and crisis), you can use this tool to outline your best and worst scenarios, or you can run this tool multiple times to create separate plans to address these scenarios.
Step 3: Click on the second worksheet, “Phases.” This worksheet contains an example of a hospital’s phased response to the COVID patient surge, from phase 0 (preparation) onward. Change, add, and delete phase IDs, names, and thresholds to match your hospital’s phase system by adding or deleting rows. (The default system has 7 phases, from phase 0 to phase 6.) “Phase demand threshold” is the number of COVID patients needed to trigger a given phase. You can also change the default numbers in these cells to reflect your hospital’s thresholds.
Note: an entry in the “Phase Demand Threshold” column will appear in red if it is smaller than the number above it.

Step 4: Click on the next worksheet, “Levels_of_care.” Change, add, and delete levels of care to reflect your hospital’s organization system for levels of care, if applicable.


Step 5: Click to the next worksheet, “Locations.” This worksheet contains information for units that will be activated throughout the phases of your COVID response. Modify, add or delete location IDs, names, care levels, and bed numbers as applicable. “Beds (current)” reflects how each unit is currently set up, and “Beds (max)” reflects expanded, maximal capacity in a crisis mode. Note: bed numbers will appear in red if the current bed number exceeds the maximum bed number.

Step 6: Click to the next worksheet, “Roles.” Modify, add or delete rows from this list of roles to reflect the roles of healthcare professionals in your hospital.
For example, if your hospital does not employ interns, residents, or fellows, you might delete these rows and change “attending” to “physician.” Additionally, if you were using the Response Planner to plan for just one type of provider – such as RTs – you could delete all the other provider roles from this worksheet. If RTs are on some of your hospital teams, but not others, don’t delete this role. You will be able to specify which Provider Roles apply to different provider teams in the “Team_Structures” worksheet.

Step 7: Click to the next worksheet, “Team_types.” These are the broad categories of teams that will be assigned to COVID or non-COVID patients. Modify, add or delete team types as applicable.

Step 8: Click to the next worksheet, “Team_names.” These are the individual lists of teams for each level of patient care. Modify, add or delete rows to reflect the names of your own care teams.

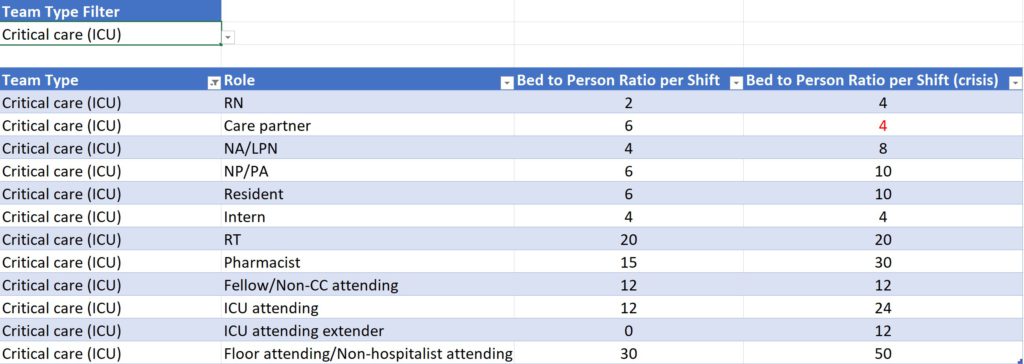
Step 9: Click to the next worksheet, “Team_structures.” You can use the dropdown, “Team Type Filter,” to easily filter the table below. Modify, add or delete the list of roles to reflect the composition of each type of care team at your hospital. For example, if you do not have respiratory therapists on a given team type, you can delete the RT role from that team type. Specify the bed-to-person ratios per shift for both normal and crisis modes. The bed-to-person ratio per shift in the crisis mode column will appear in red if it is lower than the normal bed-to-person ratio per shift.
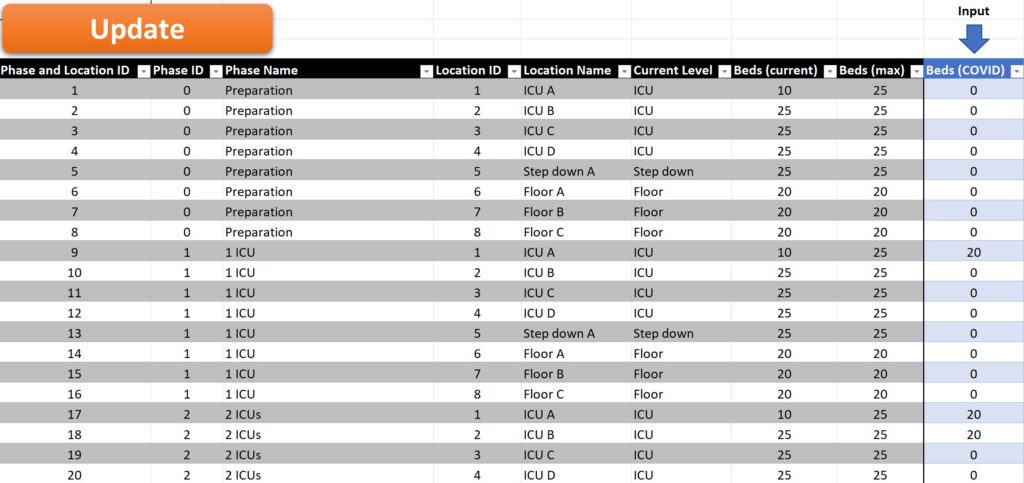
Step 10: Click to the next worksheet, “Locations_by_phase.” Click on the orange “Click to Update” button to incorporate the changes you have made to previous worksheets (e.g., phases, levels of care, and locations). This may take up to 30 seconds to run.
The columns in gray will show data carried forward from your previous entries; do not modify any of these columns. In the blue column on the far right, beneath the “Input” arrow, allocate beds to COVID patients by location and phase.
If you need to make any changes to the previous worksheets (e.g. if you would like to incorporate additional Team Names), you can go back and modify, add or delete these. Make sure you “Click to Update” after making these earlier changes.
Step 11: Click to the next worksheet, “Teams_by_location.” Click on the orange “Click to Update” button to incorporate the changes you have made to previous worksheets (e.g., team types, team names, or locations by phase). This may take up to 30 seconds to run.
The columns in gray will show data carried forward from your previous entries; do not modify any of these columns. In the two blue columns on the far right, beneath the “Input” arrows, assign teams to locations by phase. To add or delete rows (e.g. if you would like to add a day, night and back-up team), click on the corresponding “Add Row” and “Delete Row” buttons. If you have added new “phases” and new “locations” (in worksheets 2 and 4), a box will appear asking you how many rows you would like to insert for those corresponding phases/locations. If you insert a row immediately below a row containing entries in the “Team Type” or “Team Name” columns, the worksheet will carry down all of the data in the gray columns.

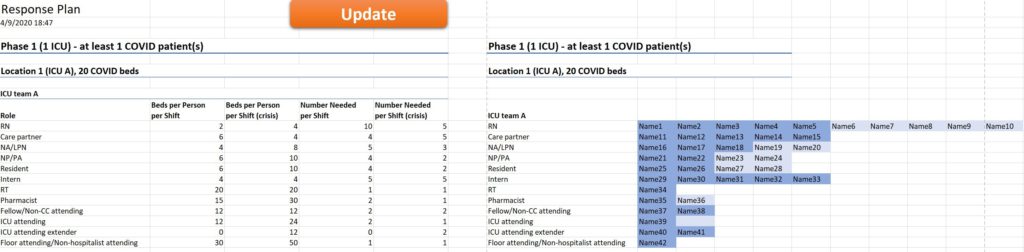
Step 12: Click to the last worksheet, “Plan.” Click on the orange “Click to Update” button to incorporate into the plan the changes you have made to the “Teams_by_location” worksheet. This will trigger the generation of an analytic file (the second to last worksheet, “Analytic_file”), and you will be given the opportunity to export this analytic file in comma-separated-value (CSV) format. This will also trigger an update to the staffing plan on the “Plan” page, and you will be given the opportunity to export this staffing plan in PDF format. You can fill in names to assign individual staff to potential roles, and these names will not disappear if you click the “Update” button. Dark blue cells correspond with the number of staff needed per shift in a crisis situation, and light blue cells correspond with the additional number of staff needed under normal circumstances.